Getting started with Pull requests

Version control systems and online-communities such as Github have made contributing to the development of opensource software incredibly easy. That is assuming that people get over their initial fear of sharing their code! In this short blog post I go through how to submit a pull request to one of our repository. Do not fear and join us for some fun! You may actually learn some interesting things along the way and we will acknowledge your contribution.

The open source community is by definition "open" to suggestions, new code submissions etc. The Underworld group adheres entirely to its philosophy and we aim at developing a broad community of not only users but contributors. We have, however, been quite frustrated to see that very few people do submit pull requests to our code base.. and we would like you to help us fixing this!
Submitting fixes, new functionalities etc. is the best way to improve the code base. While we cannot guarantee that we will integrate the submission we can definitely review it. If you think there is something wrong or that there is a better way to do things, there is a good chance that YOU might be right, so instead of sending the developers an email that is very likely to get lost in the meanders of our crazy lives, take control on things and send us a pull request on Github!
What are Pull Requests and how do I create one?
Pull requests are a feature specific to GitHub. They provide a simple web-based way to submit changes to a code repository. It is called a Pull request because you are asking the owner of a code to pull your changes from your fork...
WTH is a Fork?
When you do development with Git, the best way to work on a new feature is to create a new branch using:
git checkout -b new_feature
When the feature is completed, tested, etc. You can then merge the content of the new_feature branch into the main branch (Note that you will have to commit your changes to your branch first):
git checkout development
git merge new_feature
That is a perfectly valid way of doing things inside a development team.
However, you need to be officially part of the team... That's where forks and pull requests come to the rescue.
Forks are basically copies of a repository at some point in time. It is called a fork because the changes you make are now dissociated from the main branch of development.
You create a fork from the GitHub Web User Interface by clicking on the fork button:

Once you have done that, you have a copy of the repository appearing in your personal repositories with the url:
https://github.com/<YourUserName>/UWGeodynamics
The fork includes all the code, branches, and commits from the original repository. You can then start doing some work.
First you need to clone the repository on your local computer:
git clone https://github.com/<YourUserName>/UWGeodynamics
Once this is done, you should do 2 things:
- Create a new branch to which you will commit your changes:
git checkout -b new_branch - Create a new remote for the upstream repository:
git remote add upstream https://github.com/underworldcode/UWGeodynamics
The latter is important because this will allow you to pull any changes that might happen on the original repository while you are doing your work.
Now you can make changes to the code. The following code creates a new branch, add a test file, and pushes it to new_branch:
>> git checkout -b new_branch
Switched to a new branch 'new_branch'
>> echo "Add some dummy text file" >> test.txt
>> cat test.txt
Add some dummy text file
>> git status
On branch new_branch
Untracked files:
  (use "git add <file>..." to include in what will be committed)
	docs/tutorials/.ipynb_checkpoints/
	test.txt

nothing added to commit but untracked files present (use "git add" to track)
>> git add test.txt
>> git commit -m "Adding a dummy text file to the new_branch"
[new_branch cf6c434] Adding a dummy text file to the new_branch
 1 file changed, 1 insertion(+)
 create mode 100644 test.txt
>> git rebase upstream/master
Current branch new_branch is up to date.
>> git push -u origin new_branch
Enumerating objects: 4, done.
Counting objects: 100% (4/4), done.
Delta compression using up to 12 threads
Compressing objects: 100% (2/2), done.
Writing objects: 100% (3/3), 328 bytes | 328.00 KiB/s, done.
Total 3 (delta 1), reused 0 (delta 0), pack-reused 0
remote: Resolving deltas: 100% (1/1), completed with 1 local object.
remote:
remote: Create a pull request for 'new_branch' on GitHub by visiting:
remote:      https://github.com/rbeucher/UWGeodynamics/pull/new/new_branch
remote:
To github.com:rbeucher/UWGeodynamics.git
 * [new branch]      new_branch -> new_branch
Branch 'new_branch' set up to track remote branch 'new_branch' from 'origin'.
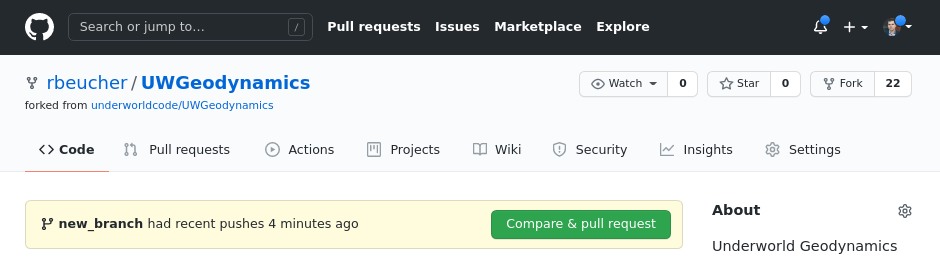
Once you push the changes to your repository, the Compare & pull request button will appear in GitHub.
Click the button which will lead you to the following page:
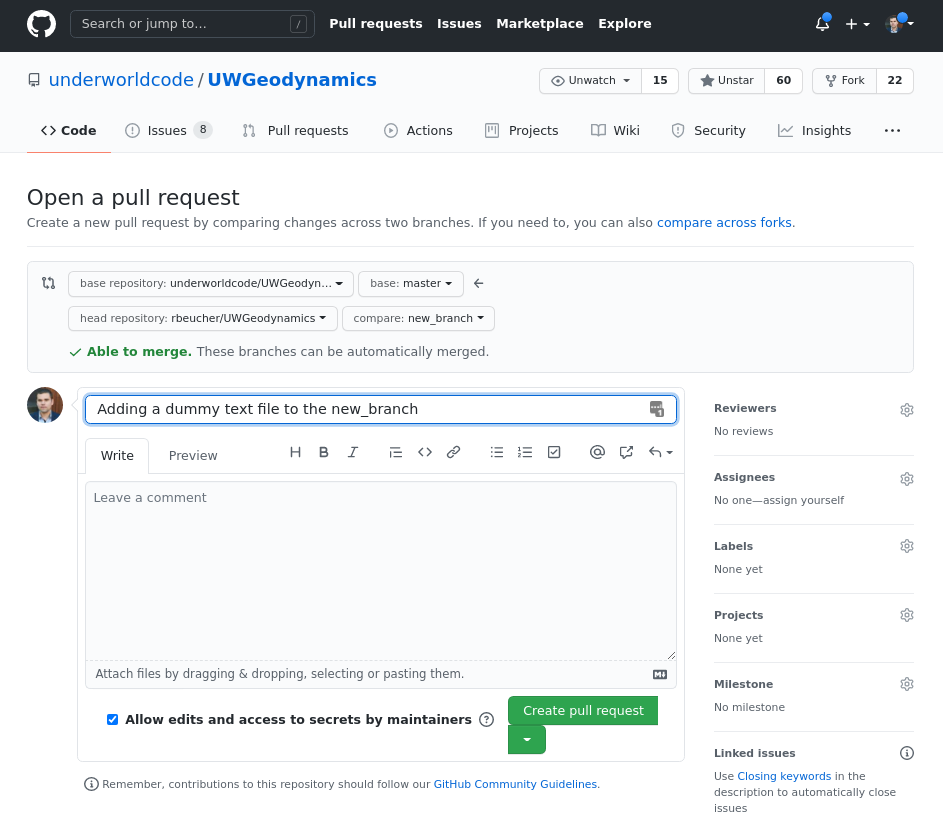
From here, make sure that the title of your pull request is meaningfull and that you clearly explain the changes you have made and why you think they were needed.
Once this is done you can Open the Pull Request by clicking the Create pull request button. This allows the maintainers to review your contribution. From here, we can merge it if it is good, or we may ask you to make some changes.
Take home message
if you want to contribute to one of our project, the simplest way is to:
- Fork it
- Clone it to your local system
- Make a new branch
- Make your changes
- Push it back to your repo
- Click the Compare & pull request button
- Click Create pull request to open a new pull request
If we ask for changes, repeat steps 5 and 6 to add more commits to your pull request.
Don't be shy, we are really looking forward to getting PRs!!!


Comments ()